
커스텀 응답에 대해 학습하는 과정에서 작성된 글입니다. 학습 과정에서 작성된 글이기 때문에 잘못된 내용이 있을 수 있으며, 이에 대한 지적이나 피드백은 언제든 환영입니다.

1. ResponseEntity의 한계
응답 데이터를 반환할 때 스프링이 제공해주는 ResponseEntity를 사용하면 간단하게 응답을 내려줄 수 있습니다. 내부에 빌더 패턴이 구현돼 있기 때문인데, 이를통해 필요한 헤더/데이터를 손쉽게 조립할 수 있습니다.
1
2
3
4
5
6
7
8
9
10
11
12
13
14
15
public class ResponseEntity<T> extends HttpEntity<T> {

    private final Object status;

    /**
     * Create a {@code ResponseEntity} with a status code only.
     * @param status the status code
     */
    public ResponseEntity(HttpStatus status) {
        this(null, null, status);
    }

    ......

}
1
2
3
4
5
6
7
8
9
10
11
12
13
14
15
16
17
18
19
20
21
22
23
24
25
26
27
28
29
30
31
32
33
34
35
36
37
38
39
// 내부에 구현된 빌더 패턴
public static BodyBuilder status(HttpStatus status) {
        Assert.notNull(status, "HttpStatus must not be null");
        return new DefaultBuilder(status);
        }

    /**
    * Create a builder with the given status.
    * @param status the response status
    * @return the created builder
    * @since 4.1
    */
    public static BodyBuilder status(int status) {
            return new DefaultBuilder(status);
        }

    /**
    * Create a builder with the status set to {@linkplain HttpStatus#OK OK}.
    * @return the created builder
    * @since 4.1
    */
    public static BodyBuilder ok() {
            return status(HttpStatus.OK);
        }

    /**
    * A shortcut for creating a {@code ResponseEntity} with the given body
    * and the status set to {@linkplain HttpStatus#OK OK}.
    * @param body the body of the response entity (possibly empty)
    * @return the created {@code ResponseEntity}
    * @since 4.1
    */
    public static <T> ResponseEntity<T> ok(@Nullable T body) {
            return ok().body(body);
        }

        ......

}
하지만 내가 반환하고자 하는 필드가 추가로 있는 경우라면 여러 가지 제약사항이 발생하게 됩니다. 물론 이를 우회해서 데이터를 추가할 수 있지만 데이터의 구조가 복잡해진다는 단점이 존재합니다.
1
2
3
4
5
6
7
8
9
10
11
12
13
/** 우회해서 사용하는 방법
 *  ApiResponse<T>를 사용해 필요한 필드/데이터를 넣을 수도 있습니다.
 *  하지만 데이터를 찾기 위해서는 ApiResponse.data와 같이 데이터를
 *  조회하기 위한 깊이(depth)가 깊어져서 API 구조가 복잡하게 됩니다.
 *  ex) ApiResponse.data.userList.user.id. .......
 * */
@GetMapping("/v3/{postId}")
public ResponseEntity<ApiResponse<PostResponse>> findPostByIdWithResponseEntity(@PathVariable Long postId) {
        PostResponse response = new PostResponse(postQueryService.findById(postId));
        return ResponseEntity
                .status(200)
                .body(ApiResponse.of(response));
}
또한 HttpServletResponse로 반환하는 응답 값은 ResponseEntity를 반환하게 되면 무시되게 되기 때문에 커스텀 할 포인트도 줄어들게 됩니다.
1
2
3
4
5
6
7
8
9
10
11
12
13
@GetMapping("/v3/{postId}")
public ResponseEntity<ApiResponse<PostResponse>> findById(@PathVariable Long postId,
                                                              HttpServletResponse httpServletResponse) {

        PostResponse response = new PostResponse(postQueryService.findById(postId));

        // ResponseEntity<T>를 반환하면 HttpServletResponse의 값은 무시됩니다.
        httpServletResponse.setHeader("key", "value");

        return ResponseEntity
                .status(200)
                .body(ApiResponse.of(response));
}
커스텀 포인트가 줄어든다는 것은 프레임워크가 제공하는 객체(ResponseEntity
)보다 서블릿과 같이 스프링 앞단의 객체를 사용하면 개발자가 세밀하게 조절할 수 있는 부분이 많은 것을 의미합니다. 또한 ResponseEntity 를 활용해 복잡한 데이터를 넣기 위해서는 컨트롤러에 로직을 구현한 후 값을 추가해야 하기 때문에 컨트롤러가 지저분해 진다는 단점도 존재합니다.
2. 커스텀 응답
이런 단점을 극복하기 위해 커스텀 응답을 만들어 사용할 수 있습니다. 방법 자체는 간단한데 아래와 같이 기본적으로 넣어줘야 할 정보(응답 시간, 상태코드, 메시지, 데이터)와 함께 추가로 자신이 반환할 필드들만 넣어주면 됩니다. 이런 커스텀 응답을 왜 사용하는지와 그 장점/단점에 대해 살펴보겠습니다.
1
2
3
4
5
6
7
8
9
10
11
12
13
14
15
16
17
18
19
20
21
22
23
24
25
26
27
28
29
30
31
32
33
34
35
@Slf4j
public final class ApiResponse<T> {

    private static final String SUCCESS = "SUCCESS";

    private final LocalDateTime eventTime;
    private HttpStatus status;
    private final int code;
    private final String message;
    private CommonInformation common;
    private T data;

    private ApiResponse(T data) {
        this.eventTime = LocalDateTime.now();
        this.status = HttpStatus.OK;
        this.message = SUCCESS;
        this.code = HttpStatus.OK.value();
        this.data = data;
    }

    private ApiResponse(HttpStatus status, T data) {
        this.eventTime = LocalDateTime.now();
        this.status = status;
        this.message = SUCCESS;
        this.code = HttpStatus.OK.value();
        this.data = data;
    }

    public static <T> ApiResponse<T> of(T data) {
        return new ApiResponse<>(data);
    }

    ......

}
2-1. 왜 사용할까?
사용하는 이유야 각자의 상황에 따라 다르겠지만 비즈니스에 필요한 정보를 담기 위해서라고 생각합니다. 예를들어 스트리밍 서비스를 하는 회사라면 모바일, 태블릿, 운영체제(맥/윈도우) 등 기기의 다양한 기종을 고려해야 합니다. 유튜브를 보는데 모바일로 보면 화면 비율이 깨지고, 컴퓨터로 보면 정상인 상황은 있어선 안되기 때문입니다.
또한 사용자의 언어/지역에 따라 보여지는 화면이 다르다면 그 사용자의 언어/지역 정보가 필요하며, 추가로 특정 연령에 대한 제한이 있다면 이것까지 고려해서 데이터를 내려줘야 합니다. 넷플릭스는와 같은 글로벌 서비스는 아래와 같이 지역(country)에 대한 정보도 필요로 하는 것을 볼 수 있습니다. 이와같이 비즈니스에 필요한 정보가 추가로 있다면 이때 커스텀 응답을 만들어 사용할 수 있습니다.
2-2. 장점
다양한 정보를 토대로 비즈니스를 확장할 수 있습니다. 최초 응답 시 정보를 내려주고 이를 브라우저에 저장해 둔다면 다음 요청때 이 정보를 토대로 사용자의 언어/지역 및 연령에 맞는 서비스를 추천 및 제공할 수 있습니다. 아래 데이터는 넷플릭스(위 사진)의 응답 데이터를 JSON 형식으로 보기 좋게 바꾼 것입니다. 아마도 넷플릭스는 이를 토대로 각 언어/지역, 연령에 맞는 추천 서비스를 제공할 것입니다.
1
2
3
4
5
6
7
8
9
{
  "membership_status": "ANONYMOUS",
  "country": "KR",
  "region_code": "11",
  "is_member": "ANONYMOUS",
  "wasFormerMember": false,
  "referrer": "nmLanding",
  "deniedConsentCookieGroups": "C0005"
}
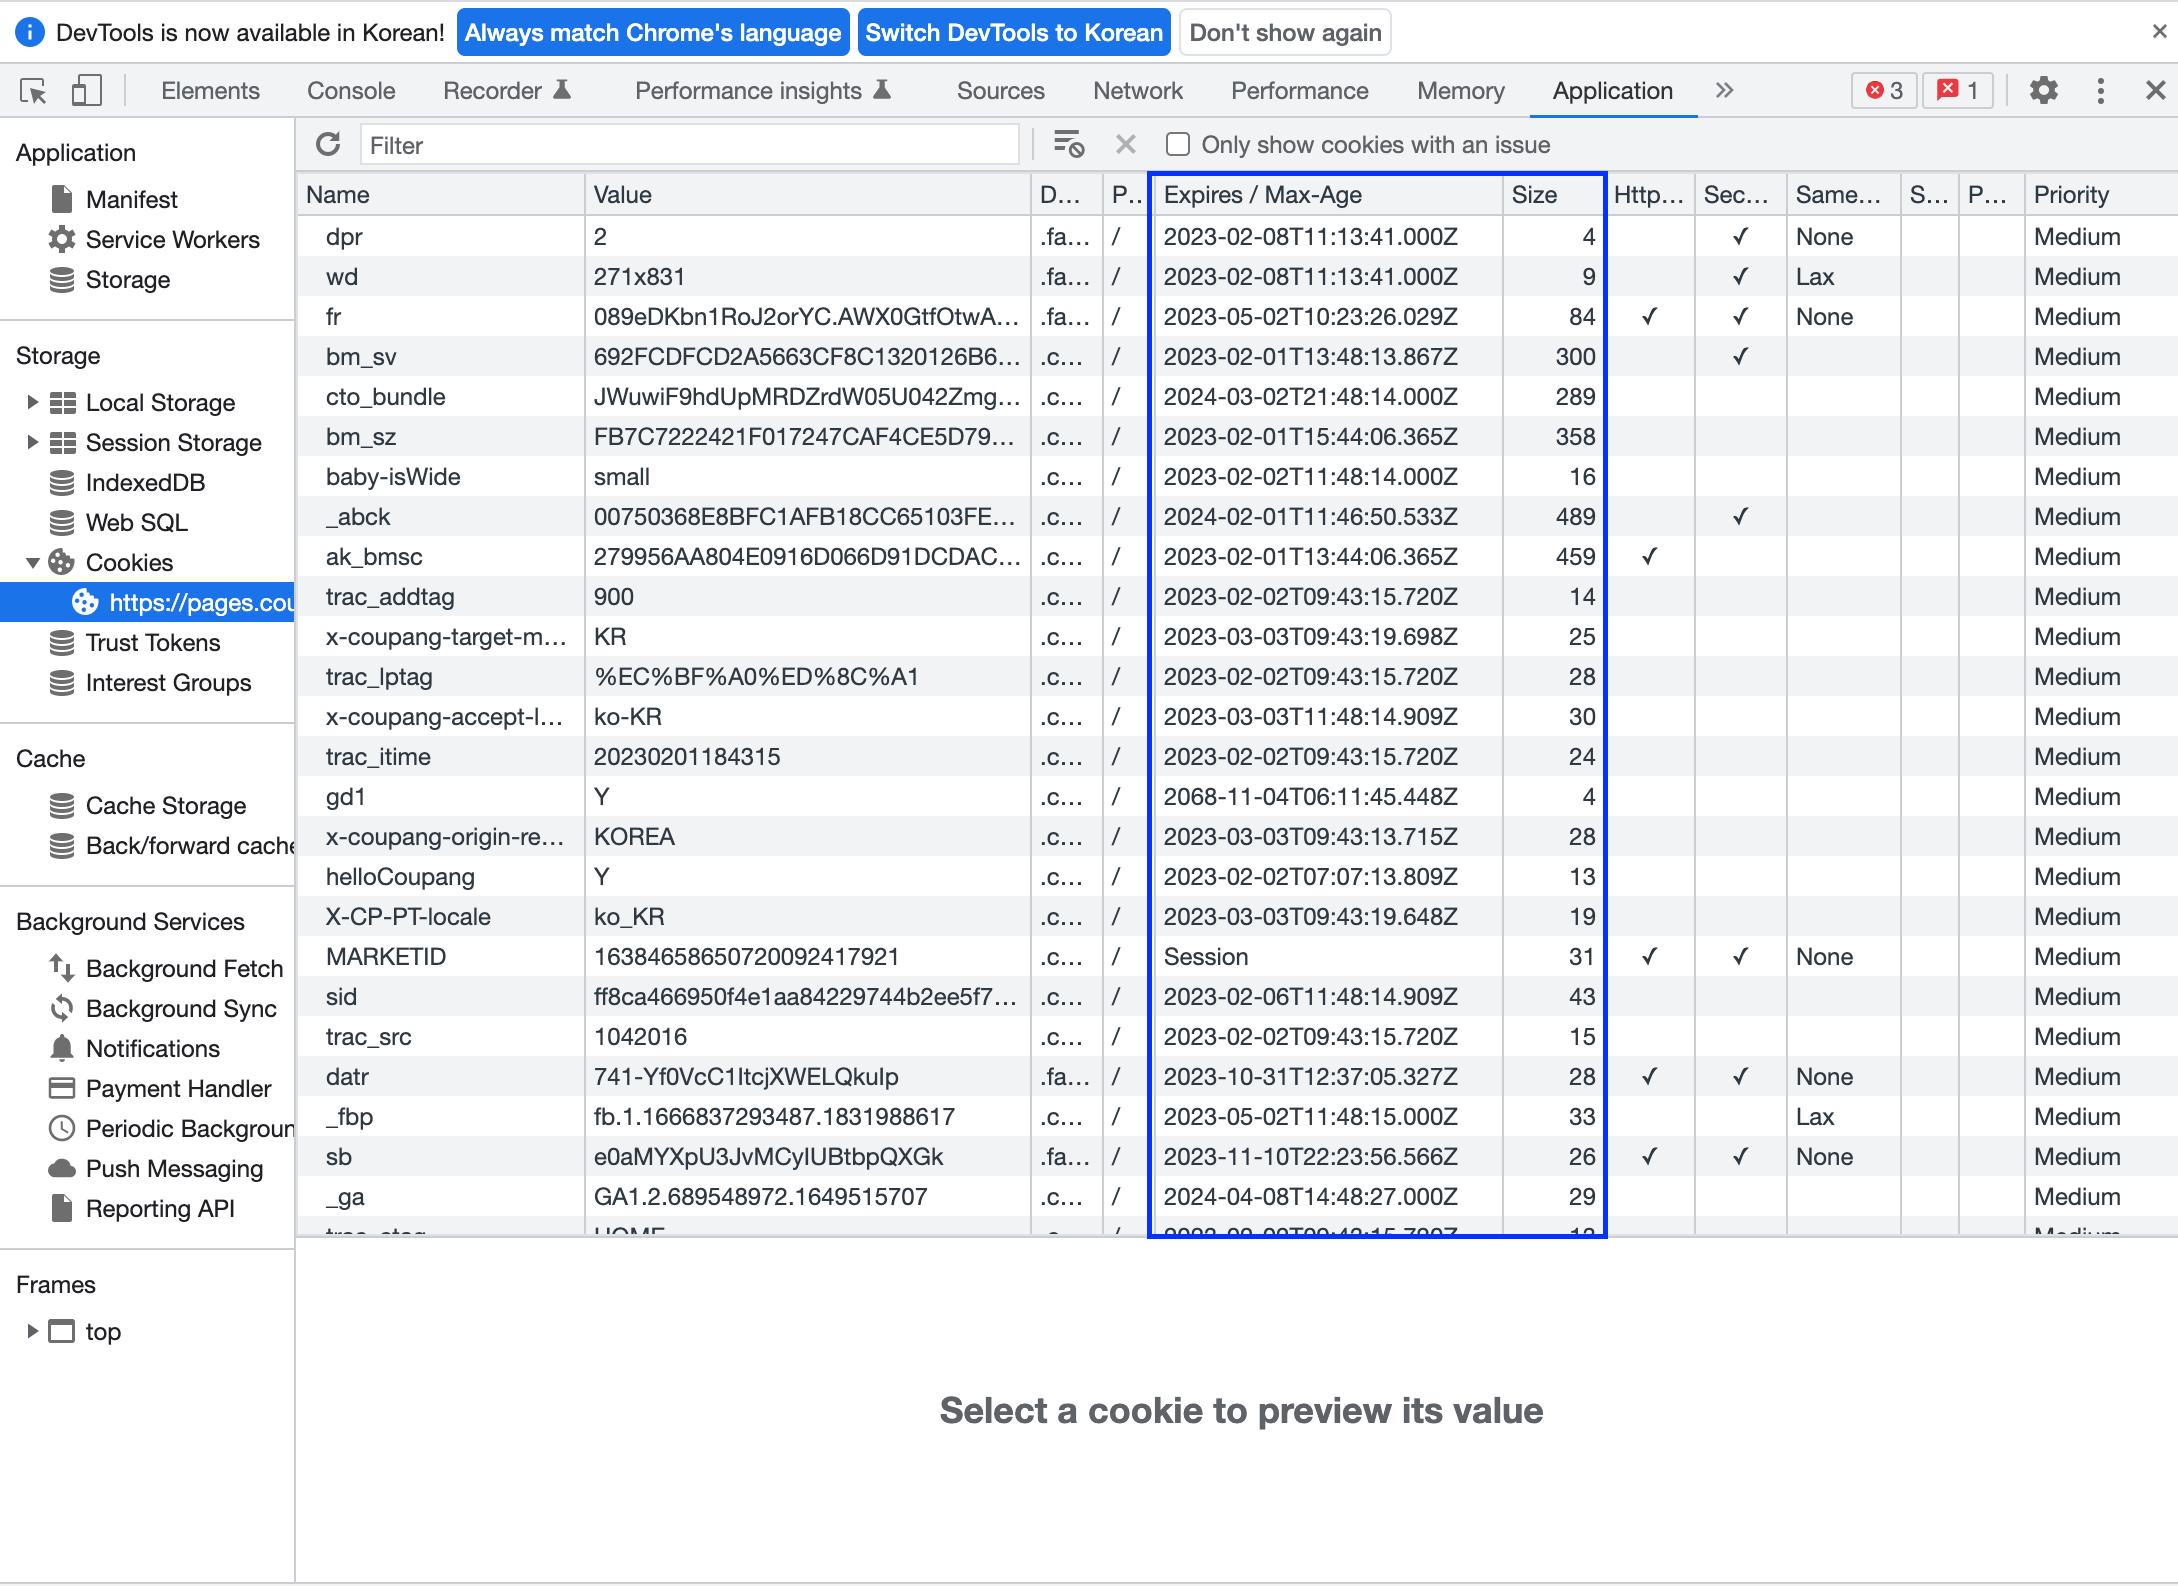
또한 커스텀 헤더를 통해 다양한 쿠키/캐시 정보를 브라우저에 저장할 수 있습니다. 쿠팡을 보면 아래와 같이 많은 응답 정보를 내려주고 있습니다. 공통 필드 부분은 별도로 분리했으며 그 외 데이터, 언어, 광고 등 다양한 정보들이 존재합니다.
이런 정보를 사용하면 애플리케이션 캐시나 레디스, 데이터베이스까지 도달하지 않더라도 브라우저에서 쿠키만 조회해 데이터를 내려줄 수 있기 때문에 조회 성능이 월등히 좋아집니다.
아래는 쿠팡의 JS 코드 중 일부입니다. 쿠팡 도메인이 워낙 크고 로직이 복잡해서 정확히 어떤 쿠키로 어떤 정보를 불러올지 알 수 없지만 쿠키를 적극 활용한다는 사실은 알 수 있습니다.
1
2
3
4
5
6
7
8
9
10
11
12
13
14
15
16
17
18
19
20
21
22
23
24
25
26
27
28
29
30
31
32
33
34
35
36
37
38
39
40
41
42
43
44
45
46
47
48
49
50
51
52
53
54
55
56
57
define(["jquery", "common/utils/validationUtils"], function ($, validator) {
    var timeUnit = {};

    ......

    // 쿠키 체크
    var cookieCheckList = ["searchKeyword"];
    var cookieDomain = {dev: "coupangdev.com", prod: "coupang.com"};
    var cookieUtils = {
        cookie: function (name, value, opts) {
            var expires = "", path, domain, secure, cookieValue, cookies, date, options = $.extend({
                timeUnit: "DAY",
                timeValue: 1,
                domain: document.domain.indexOf("coupang.com") > -1 ? cookieDomain.prod : cookieDomain.dev,
                path: "/"
            }, opts || {});
            if (value === null) {
                value = "";
                options.timeValue = -1
            }
            if (typeof value !== "undefined") {
                if (options.timeValue && (typeof options.timeValue === "number" || options.timeValue.toUTCString)) {
                    if (typeof options.timeValue === "number") {
                        date = new Date;
                        date.setTime(date.getTime() + options.timeValue * timeUnit[options.timeUnit.toUpperCase()])
                    } else date = options.timeValue;
                    expires = "; expires\x3d" + date.toUTCString()
                }
                path =
                    options.path ? "; path\x3d" + options.path : "";
                domain = options.domain ? "; domain\x3d" + options.domain : "";
                secure = options.secure ? "; secure" : "";
                document.cookie = [name, "\x3d", encodeURIComponent(value), expires, path, domain, secure].join("")
            } else {
                cookieValue = null;
                if (document.cookie && document.cookie !== "") {
                    cookies = document.cookie.split(";");
                    for (var i = 0; i < cookies.length; i++) {
                        var cookie = $.trim(cookies[i]);
                        if (cookie.substring(0, name.length + 1) === name + "\x3d") {
                            cookieValue = decodeURIComponent(cookie.substring(name.length + 1));
                            break
                        }
                    }
                }
                // 쿠키 반환
                return cookieValue
            }
        }

        ......

    };

    ......

});
실제 쿠키 탭을 보더라도 많은 쿠키를 사용하는 것을 볼 수 있습니다. 크기가 작은 것부터 큰 것까지, 그리고 짧게는 하루에서 길게는 1년단위까지 쿠키를 보관합니다. 이를 토대로 조회성능을 크게 올릴 수 있는 것입니다.
또한 컨트롤러의 로직을 깔끔하게 가져갈 수 있습니다. 이런 부가적인 데이터 추가 로직을 컨트롤러에서 넣는다면 핵심 로직을 구분하기가 쉽지 않을 것입니다. 하지만 커스텀 응답을 통해 AOP로 처리한다면 이를 조금 더 깔끔하게 처리할 수 있습니다.
1
2
3
4
5
6
7
8
9
10
11
12
13
14
/**
 * 만약 이를 컨트롤러에서 처리한다면 아래와 같이 여러 추가 로직이 들어가게 됩니다.
 */
@PostViewCountIncrement
@GetMapping("/{postId}")
public ResponseEntity<PostResponse> findPostByIdSimple(@PathVariable Long postId) {
        PostResponse response = new PostResponse(postQueryService.findById(postId));

        // 1. 헤더 생성 및 헤더에 데이터 넣어주는 로직 추가
        // 2. 헤더에 데이터 추가 및 조립
        // .......

        return ResponseEntity.ok(response);
    }
만약 ResponseEntity
1
2
3
4
5
6
7
8
9
10
11
12
13
14
15
16
17
18
19
20
21
22
23
24
25
26
@Aspect
@Component
public class ResponseAspect<T> {

    @Pointcut("execution(* study.project.codeexample.web.post.presentation.PostController.findPostById(..))")
    private void registCommonHeader() {
    }

    @AfterReturning(pointcut = "registCommonHeader()", returning = "response")
    public void setResponse(JoinPoint jp, Object response) throws NoSuchFieldException, IllegalAccessException {
        HttpServletRequest httpServletRequest = extractHttpServletRequest();
        HttpServletResponse httpServletResponse = extractHttpServletResponse();
        ApiResponse<T> apiResponse = cast(response);

        // 공통 헤더 데이터 추가
        String data = extractDataFrom(httpServletRequest);
        registCommonHeader(apiResponse, httpServletRequest);

        Cookie cookie = createCookieFrom(data);
        httpServletResponse.addCookie(cookie);
        log.info("Response: {}", response);
    }

    ......

}
2-3. 단점
명확한 API 명세를 정해야 하며 복잡한 데이터 구조, 로직, 쿠키/캐시 등을 별도로 작성해주어야 하는 단점이 존재합니다. 명확한 API 명세가 존재하지 않으면 비즈니스 요구사항에 의해 추가되는 필드/데이터들로 인해 기존의 API 명세가 망가지거나 팀 내 규칙이 깨질 수 있습니다. 규칙이 깨지는 문제는 생각보다 큰데 ‘이번 한 번정도는, 이거 하나 정도는 이렇게 해도 되겠지’ 하다가 기존의 규칙이 깨지고, 또 무분별하게 필드를 추가할 수 있기 때문입니다. 따라서 이 부분에서 명확한 명세가 필요합니다.
1
2
3
4
5
6
7
8
9
10
11
12
13
14
15
16
17
18
19
20
21
22
23
24
25
26
27
28
29
30
31
32
33
34
/**
 * '팀 내 DTO를 기본적으로 불변으로 가져가지만 AOP를 사용해
 *  Common필드(언어, 기기 등)를 싣기 위한 setter는 허용한다'
 *  와 같은 명확한 규칙이 필요합니다. 또한 추가되는 데이터에 대해
 *  이를 명시해주면 더욱 좋습니다.
 */
@Slf4j
public final class ApiResponse<T> {

    private static final String SUCCESS = "SUCCESS";

    private final LocalDateTime eventTime;
    private HttpStatus status;
    private final int code;
    private final String message;
    private CommonInformation common;
    private T data;

    private ApiResponse(T data) {
        this.eventTime = LocalDateTime.now();
        this.status = HttpStatus.OK;
        this.message = SUCCESS;
        this.code = HttpStatus.OK.value();
        this.data = data;
    }

    // DTO에 개방한 setter
    public void registCommonInformation(CommonInformation common) {
        this.common = common;
    }

    ......

}
또 다른 단점은 스프링이 제공하는 편리한 기능을 사용하지 못한다는 점입니다. 예를들어 ResponseEntity
1
2
3
4
5
6
7
8
9
10
11
12
13
14
15
16
17
18
19
20
21
22
23
24
25
26
27
28
29
@RestController
@RequiredArgsConstructor
@RequestMapping("/api/posts")
public class PostController {

    private final PostQueryService postQueryService;

    @GetMapping("/v2/{postId}")
    public ResponseEntity<PostResponse> findPostByIdResponseEntity(@PathVariable Long postId) {
        PostResponse response = new PostResponse(postQueryService.findById(postId));

        // 빌더로 조립
        return ResponseEntity
                .status(200)
                .body(response);
    }

    @PostViewCountIncrement
    @GetMapping("/v2/{postId}")
    public ResponseEntity<Void> updatePost(@PathVariable Long postId,
                                           @RequestBody PostUpdateRequest request) {
        postQueryService.update(postId, request);

        // 빌더로 조립
        return ResponseEntity
                .noContent()
                .build();
    }
}
물론 이는 단점이자 장점이기 때문에 무작정 단점이라 볼 수는 없습니다.
예를들어 쿠키를 내려줄때 ResponseEntity
1
2
3
4
5
6
7
8
9
10
public void setResponse(
            HttpServletRequest servletRequest,
            HttpServletResponse servletResponse
    ) {

        ......

        Cookie cookie = createCookieFrom(servletRequest);
        httpServletResponse.addCookie(cookie);
}
1
2
3
4
5
6
7
8
private Cookie createCookieFrom(HttpServletRequest servletRequest) {
        Object data = extractDataFrom(servletRequest);
        Cookie cookie = new Cookie("key", data);
        cookie.setHttpOnly(true);
        cookie.setMaxAge(3600);
        cookie.setSecure(true);
        return cookie;
}
3. 언제 사용해야 할까?
현재 도메인에서 비즈니스적으로 사용할 정보가 있거나 복잡한 쿠키/캐시 로직을 사용한다면 커스텀 응답을 사용하면 좋을 것 같습니다. 요청정보를 사용하지 않거나 서비스가 복잡하지 않은데 커스텀 헤더를 사용하게되면 코드레벨에서 구현해야 할 것들이 많기 때문에 신경써야 할 것들이 많아지기 때문입니다. 따라서 자신의 도메인 특성과 비즈니스적으로 이를 활용할 것인지, 복잡하고 다양한 쿠키/캐시를사용하는지 등 여러 상황을 고려해서 이를 활용하면 될 것 같습니다.
4. 정리
커스텀 응답을 사용해도 되고 안 해도 괜찮습니다. 다만 프로젝트가 복잡하고 커질수록 비즈니스 요구사항은 계속해서 추가될 것이고, 이에 적절한 대응을 하기 위해서는 커스텀 헤더를 통해 필요한 정보를 내려줄 수도 있어야 합니다. 우선 자신의 현재 도메인과 상황을 종합적으로 판단해보고 필요하다면 이를 커스텀하는 것을 고려해봅니다.